NAS Project
Building a reliable, multi-protocol NAS (SMB, NFS, FTP) on a Raspberry Pi 4 using OpenMediaVault.
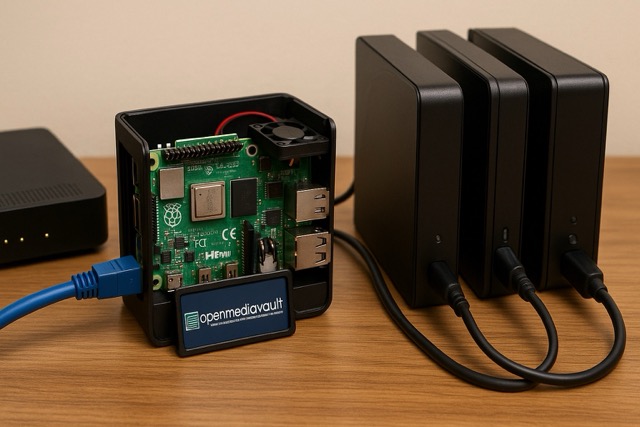
I have been working on a NAS (Network Attached Storage) project at home. The goal is to create a centralized storage solution that can be accessed from anywhere in the house, and also in future remotely when needed.
This project is a great way to learn about Linux, networking, and storage solutions. Here's a quick overview of what I set out to achieve:
- Create a solid, always available storage server accessible from any device on my local network.
- Lay the groundwork for future remote access, so I can grab a photo or a video from anywhere in the world.
Why a Home NAS?
- Centralized Storage
No more USB drives or SD cards for copying data between devices. Everything lives in one centralized place.
- Media Streaming
Stream movies, music and photos to TVs, laptops and phones without juggling external drives.
- Automated Backups
To be done, Weekly backups of devices to keep data safe and recoverable.
Hardware & Software Stack
- Raspberry Pi 4
Consumes low power draw, silent operation, and enough USB 3.0 throughput for a few spinning drives. Can mount hats for additional functionalities for NVMe storage or other peripherals in the future.
- OpenMediaVault (OMV)
One of the most popular and open-source debian linux based NAS OS/Software with a polished web UI—packages for SMB, NFS, FTP for file sharing and mainly support raid configurations for redundancy.
- External Drives
A 1TB HDDs in a USB-powered. Can also add more USB drives as needed.
- Networking
- Static IP via NetworkManager to keep the server address predictable.
- Connected via Ethernet cable for maximum throughput.
What I Did
- Hardware Assembly
– Assembled the RaspberryPi 4 + USB-HDD.
– No need for any monitor, keyboard or mouse as all the configuration is done via Raspberry Pi Imager and later using SSH.
- OMV Installation & Configuration
– Ran OMV install script using SSH.
– Created and mounted file systems (EXT4) in the web UI.
– Defined shared folders and applied user/group permissions.
- Service Enablement
– SMB for Windows clients, NFS for Linux/macOS, and FTP.
– Next set up docker on the Raspberry Pi for future containers.
- Installed Plex Media Server for streaming media files to various devices.
- Networking
– Assigned a static IP via nmcli.
Key Lessons & Next Steps
- Learning Curve
Setting up a NAS from scratch taught me a lot about Linux, networking, and storage management.
- Remote Access
Next up is setting up a VPN so I can safely reach my NAS from anywhere.
- Future Services
I plan to add more services like a home automation server, Torrent client and Media backups.
- Containerization
I'll deploy Nextcloud in Docker for cloud-style file sync, and Plex for on-the-fly transcoding.
Why This Matters
This project forced me to learn Linux SysAdmin skills for real. I got comfortable with fstab, user groups, systemd, and diagnosing network bottlenecks. It's not just a hard drive plugged into a router; it's a managed storage server.
This project not only gave me a robust home-grown storage server but also deepened my skills in Linux administration, networking, and automation. Stay tuned for a detailed setup guide coming next!